Contents
- Introduction
- Setup
- OCR
- Translation
- Putting it all together with a loop
- Results
- Other Possibilities with Scripting and ImageMagick
- Conclusion
Introduction
This is a lesson about the benefits and challenges of integrating optical character recognition (OCR) and machine translation into humanities research. Many of my fellow historians are sceptical of investing time into learning digital techniques because they do not see the benefit to their research. But we all live in a world where our digital reach often exceeds our grasp. Researchers can access thousands of pages from online digital collections or use their cellphones to capture thousands of pages of archival documents in a single day. Access to this volume and variety of documents, however, also presents problems. Managing and organizing thousands of image files is difficult to do using a graphical user interface(GUI). Further, while access to documents relies less on geographic proximity, the language a text is written in restores borders. Access to documents does not equal understanding. Command line tools, like simple Bash scripts, offer us solutions to these common problems and can make organizing and editing image files much easier. Combining optical character recognition (OCR) and machine translation (APIs), like Google Translate and Bing, promises a world where all text is keyword searchable and translated. Even if the particular programs demonstrated in this lesson are not of interest to you, the power of scripting will be apparent. Combining multiple command line tools, and designing projects with them in mind, is essential to making digital tools work for you.
Lesson Goals
- Learn how to prepare documents for OCR
- Create a Bash script that will prepare, OCR, and translate all documents in a folder
- Learn how to make scripts to organize and edit your documents
- Understand the limitations of OCR and machine translation
Setup
Command Line and Bash
This tutorial uses the Bash scripting language. If you are not comfortable with Bash, take a moment to review the Programming Historian “Introduction to the Bash Command Line” tutorial (for Linux and Mac users) or the “Introduction to the Windows Command Line with PowerShell” tutorial (for Windows users). Bash comes installed on Linux and Mac operating systems.
You will need to install several more programs. The rest of this section will take you through how to install the required programs through the command line.
Now it is time for our first command. Open a Terminal and enter the command cd Desktop to move to the Desktop as our working directory.
Acquire the Data
For this tutorial, you will use two documents from the Wilson Center Digital Archive’s collection on Iran-Soviet relations. Download the “Message from Bagirov to Aleksanrov on Printing Presses” (Example One) and the “Letter, Dimitrov to Molotov,’The Situation in the People’s Party of Iran” (Example Two). These documents are originally from the Azerbaijan State Archive of Political Parties and Social Movements. Both documents are in Russian and primarily address the Iran Crisis of 1946. I selected these documents for two reasons. One, the documents are high quality scans, but have defects common to many archival documents. Two, each document comes with an English translation, so we will be able to judge the quality/accuracy of our machine translations.
Save both example documents in a new folder on your Desktop. From now on, I will refer to the two articles as Example One and Example Two. Example one has a lot of noise, or unwanted variations in color and brightness. As you can see, the image is skewed and there is writing in different fonts and sizes, errant markings, and visible damage to the document. While we cannot remove noise all together, we can minimize it by preprocessing the image.
Image Processing
The most important factor to OCR accuracy is the quality of the image you are using. Once the photo is taken, you cannot increase the resolution. Further, once you have decreased the resolution of an image, you cannot restore it. This is why you should keep an access and an archive copy of each image. Ideally the archive copy will be a TIFF file, because other file formats (notably JPG) compress the data in such a way that some of the original picture quality is lost. Consequently, JPG files are much smaller than TIFF files, which is not neccessarily a problem. If you are working with typewritten documents that are clearly readable, you do not have to worry about this issue. If you work with older, damaged, or handwritten documents, you may need the extra resolution in your images.
When scanning or taking a photo of a document, make sure you have enough light or the flash is on so that the image is not too dark (e.g. use the camera flash or additional external lights) and avoid taking the photo at a skewed angle. That is, the text lines in the document should appear straight in the picture.
Often we are stuck with images that have significant noise. For example, we cannot remove damage to the original document. There are steps we can take to optimize the image for OCR and improve the accuracy rate. The first thing we will need to do is install a free command line tool called ImageMagick.
Installing ImageMagick
Mac Installation
Mac users will need to install a package manager called Homebrew. Installation instructions can be found on the Homebrew website.
For Mac operating systems, the installation requires you to enter two simple commands into the terminal window:
brew install imagemagick
brew install ghostscript
Windows Installation
The Windows instructions for ImageMagick can be found on ImageMagick’s website.
Converting PDFs to TIFFs with ImageMagick
With ImageMagick installed, we can now convert our files from PDF to TIFF and make some changes to the files that will help increase our OCR accuracy. OCR programs will only accept image files (JPG, TIFF, PNG) as input, so you must convert PDFs. The following command will convert a PDF and make it easier to OCR:
convert -density 300 INPUT_FILENAME.pdf -depth 8 -strip -background white -alpha off OUTPUT_FILENAME.tiff
The command does several things that significantly increase the OCR accuracy rate. The density and depth commands both make sure the file has the appropriate dots per inch (DPI) for OCR. The strip, background, and alpha commands make sure that the file has the right background. Most importantly, this command converts the PDF into a TIFF image file. If you are not using a PDF, you should still use the above command to ensure the image is ready for OCR.
After these changes, your image may still have problems. For example, there may be a skew or uneven brightness. Fortunately, ImageMagick is a powerful tool that can help you clean image files. For other ImageMagick options that can improve OCR quality, review this helpful collection of scripts. Because OCR is a command line tool, you can write a script that will loop over over all of your images (hundreds or thousands) at once. You will learn how to write these kinds of scripts later in the lesson.
OCR
This lesson will use the OCR program Tesseract, the most popular OCR program for Digital Humanities projects. Google maintains Tesseract as free software and released it under the Apache License, Version 2.0. Tesseract supports over 100 different languages, but if you have a particularly difficult or unique script (calligraphy or other handwriting) it might be worth training your own OCR model. For typewritten documents, you need a program that will recognize several similar fonts and correctly identify imperfect letters. Tesseract 4.1 does just that. Google has already trained Tesseract to recognize a variety of fonts for dozens of languages. The following commands will install Tesseract as well as the Russian language package, which you will need for the rest of the lesson:
sudo port install tesseract
sudo port install tesseract-rus
Windows installation instructions can be found in the Tesseract GitHub documentation.
The commands for Tesseract are relatively simple. Just type:
tesseract INPUT_FILENAME OUTPUT_FILENAME -l rus
Our output is a transcription of the input file as a plain text file in Russian. The -l parameter specifies the source language in the document. More parameter options can be found in the Tesseract GitHub documentation
Translation
Translate Shell is a freeware program that allows you to access the API of machine translation tools like Google Translate, Bing Translator, Yandex.Translate, and Apertium from the command line instead of a web browser. For this exercise, we are going to use Yandex because they have a reputation for good Russian-English translation and a high request limit. However, Yandex does not support as many languages as other translators. While translation APIs do not charge per se, they do limit the amount you can access from the command line in various ways. For example, there is a limit of 5, 000 characters per request for Google Translate. So if you send the API a 10,000 character file, Google Translate will translate the first 5,000 and stop. If you make too many requests in too short an amount of time, the API will temporarily block your IP address. You will need to experiment to find out which translation API works best for you and your text.
To install Translate Shell, you will need to download and run the installation package. Enter the following commands into terminal:
wget git.io/trans
and then
chmod +x ./trans
Using Translate Shell is relatively easy. The line below takes a file, translates it into English, and saves the output.
trans -e yandex :eng file://INPUT_FILENAME > OUTPUT_FILENAME
The parameter -e specifies the translator you want to use.
Putting it all together with a loop
Thus far, we have gone over the individual commands to preprocess, perform OCR, and translate our documents. This section will cover how to automate this process with a script and iterate commands over all the files in a folder.
First, we need to open Nano and begin writing our script. Nano is a freeware text editor available on Linux and MacOS. It is easy to use, but has few of the editing feature you would see in Emacs or Vim. Any text editor will do. You cannot use your cursor in Nano. Instead, you will have to navigate using the arrow keys and enter. Our script will be quite small, so the limited editing features of Nano will not be a problem. When writing longer programs, you should use more advanced text editors. Open Nano by typing nano DESIRED_FILENAME in the command line.
Next, you should enter in a shebang. This line will tell the computer what language your script is written in. For a Bash script, the line should be #!/bin/bash.
The script we are going to write will have three parts. First, it will prompt you to enter in a folder where your images are stored. Second, it will prepare, OCR, and translate the images in that folder. Third, it will save the transcriptions and translations to separate folders.
To incorporate user input, add read -p followed by a prompt for the user. For example, the following two lines of code will prompt you for the name of a folder on your Desktop and then create a variable containing the full file path of that folder.
read -p "enter folder name: " folder;
FILES=/Users/andrewakhlaghi/Desktop/test_dir/$folder/*
The folder name you enter is passed to a variable named folder and is then passed into the variable FILES to complete the filepath.
Next, we need to set up a loop to iterate through all the files in the folder.
for f in $FILES;
do
  tiff=${f%.*}.tiff
  convert -density 300 $f -depth 8 -strip -background white -alpha off $tiff
  ocr=${f%.*}_ocr
  tlate=${f%.*}_trans
  tesseract $tiff $ocr -l rus
  trans -e yandex :eng file://$ocr.txt > $tlate.txt
  sleep 1m
done
Most of this code should be familiar from the example code in the previous sections on ImageMagick, Tesseract, and Translate Shell. There are three important additions for iterating these processes:
- There is a loop. The first line creates a new variable,
f, that will hold the name of each file in our directory. - We use the image file name to create the transcription and translation filenames. The command
${VARIABLE%.*}takes a file and removes the file extension. The%command removes a suffix. The.*specifies that the suffix is a “.” and whatever follows it. - The
sleep 1mcommand halts the program from starting the next file for one minute. This allows the previous file to finish being translated and written, as well as spacing out your requests to the translation APIs so they will not block your IP. You may need to adjust the sleep time as APIs change their policies on what constitutes “too many” requests.
The third and final block of code will create two folders for your transcriptions and translations and move all the transcriptions to one folder and all the translations to the other folder.
mkdir $folder"_ocr"
mkdir $folder"_translation"
mv *_ocr.txt *_ocr
mv *_trans.txt *_translation
Add all three blocks together in your Nano file. Remember to include the correct shebang at the top of the script. Once the file is saved, you need to make it executable. That is, you need to change the permissions on the file so that it is treated as a script. Enter the command chmod a+x FILENAME. To execute the file, write ./FILENAME
Results
As you look at the output, you will see that machine translation and OCR require significant editing from someone with knowledge of the source and target languages, as well as the subject being discussed.
The results for Example One demonstrate how important the quality of the input image is. The image from Example One is both skewed and has significant noise. The presence of speckles, dark streaks, and broken lettering make it difficult for the program to classify letters. The skew makes it difficult for the program to recognize lines of text. The combination of the two sources of error produces a very poor transcription.
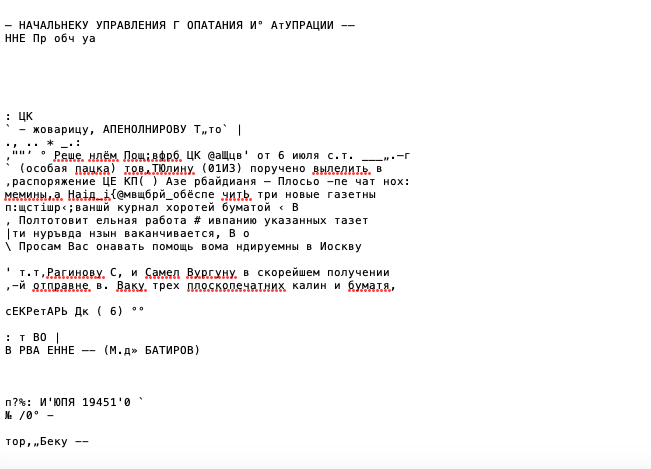
Figure 1: Our transcription of Example One
The results for Example Two demonstrate that even with a good image, your initial transcription and translation will still contain errors. Example Two has some errant handwriting, but is generally free of noise and is not skewed. Even if the conversion of the image into text has relatively few errors, machines may not understand how to correctly translate every word. For example, the translation of Example Two’s second page has the erroneous translation, “The party’s connection to the owls.” (see Figure 2) This error comes from the abbreviation “сов.” is short for “советский” (Soviet). However, the translator recognized the abbreviation as “сов” for owl. A human reader could recognize the period as a sign that the word is an abbreviation and fill in the rest of the word based on context. Even though the OCR program correctly transcribed the period, the translator did not understand what to do with it.
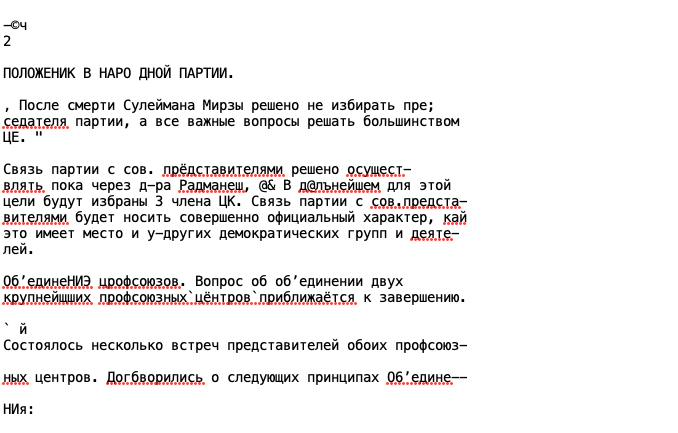
Figure 2: The owl sentence in Russian
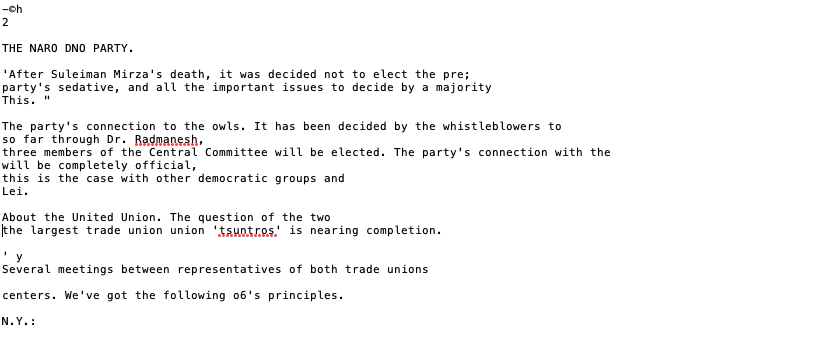
Figure 3: The owl sentence is translated
Another problem in the translation are the hyphens. While Tesseract correctly transcribed the hyphens, neither Tesseract nor Yandex understood their purpose. While the hyphen tells the reader to follow the word onto the next line, both programs treated the two halves as separate words. Obviously you can delete the hyphens individually, but that is tedious. One way to deal with this is to create a a short regular expression script to (See the Programming Historial “Cleaning OCR’d Text with Regular Expressions” tutorial.) to delete the hyphen and join the two lines.
In addition to the hyphen and the abbreviation, Tesseract identified two “а”s as “@”s in our sentence about owls. Considering email did not exist until the early 1960’s, it is safe to assume that any “@”s appearing in the document are in fact incorrectly recognized “а”s. Therefore we can either use a regular expression script or your text editor’s Find and Replace function to make the substitutions accordingly.
You can also use the Bash command sed to edit your document. For example, the sed script sed s/@/а/g DOCUMENT.txt will find all “@” characters and replace them with “а”.
If a sentence ends in a hyphen, the following sed script below will delete the hyphen and join the two lines:
sed -e :a -e '/-$/N; s/-\n//; ta' INPUT.txt
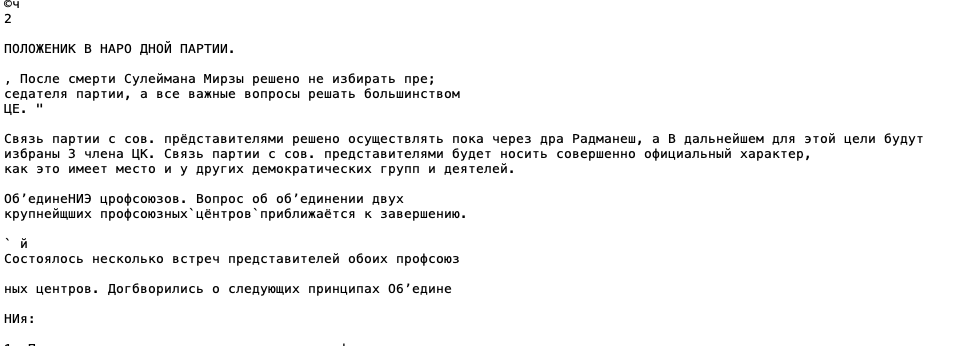
Figure 4: Our passage after a little editing
Much like the other commands shown previously, you can keep a list of sed commands in a longer script and apply them to other documents you OCR.
After making the above edits, put your edited transcription back through the translation API. Look at the improvement to the sentence about owls. You can see how a few edits can radically improve the quality of our translations.
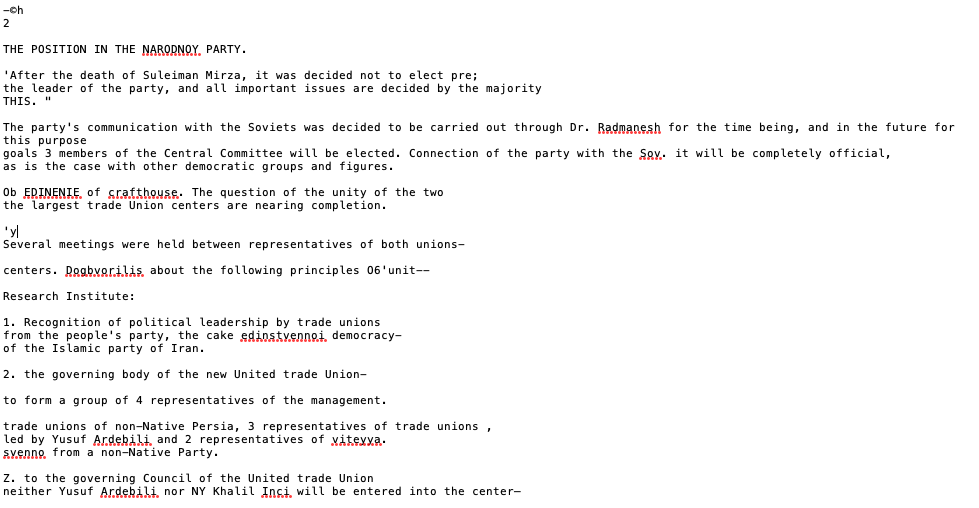
Firgure 5: The improved translation
Other Possibilities with Scripting and ImageMagick
Editing your Documents with ImageMagick
You can also write a script to edit the images themselves. You already learned how to use ImageMagick to prepare a file for OCR, but ImageMagick also has more options for editing images. Looking at Example One, you will want to do three things to increase the accuracy of the OCR:
- Crop the picture and remove the excess border space around the document.
- Straighten the image so that the lines of text are parralel to the bottom of the document.
- Remove all the noise, especially the dark specks, that appears throughout the document.
All three of these tasks can be iterated in a script.
Cropping commands will be specific to each document. There are programs that can detect and cut around text. However those smart cropping programs are significantly more complicated and are outside the scope of this tutorial. Fortunately, smart cropping may not be necessary for editing your archival documents. When you take photos of documents, you probably do so from the same angle and height. The relative position of the text in different photos will be similar. Consequently, you will want to trim similar amounts of the image from similar relative locations in the photograph to isolate the text. Remember, your cropped document does not need to be perfect for Tesseract to work. But removing any marginal notes or discolorations will increase the accuracy of the OCR. After some experimentation, you will find that for the given input images in Example One you want to remove 200 pixels from the top of the document, 250 pixels from the right, 250 pixels from the bottom, and 800 pixels from the left of Example One.
The following script allows you to crop and deskew every document in a given folder:
#!/bin/bash
read -p "enter folder name: " folder;

FILES=/FILE_PATH/$folder/*
for f in $FILES;
do
  convert $f -gravity north -chop 0x200 -gravity east -chop 250x0 -gravity south -chop 0x800 -gravity west -chop 800x0 $f
  convert $f -deskew 80% $f
done
The second parameter will deskew each image as well. That is, the deskew parameter will make sure that the body of the text is parallel with the bottom of the page. Remember, the chop parameter will remove the specified amounts of pixels regardless of whether there is text on them. Therefore, you will want to be careful about the contents of the folder you use with this script. This script will not only remove the same amount from the same location on each image, it will also save over the original image with the edited version. To avoid overwriting the original, change the second $f filename. For example, if your files were named in the IMG_XXXX.JPG format, you would replace the second $f with ${f%.*}_EDITED.jpg. This will remove the filename extension from the filename for each file and insert EDITED.jpg to distinguish the edited versions.
Finally, we can another section of code to reduce the noise in the image. As discussed previously, noise refers to unwanted variations in the brightness and color of digital media. In the case of Example One, we can see a large number of black dots of varying size and shape splattered all over the document. This noise could be the result of problems with the image capture device or damage to the original document. The ImageMagick despeckle command detects and reduces these dots. However, the despeckle command has no parameters. To meaningfully decrease the size of the spots on Example One, you will have to repeatedly run the despeckle command on your file. Rewriting commands over and over would be tedious, but luckily, we can write a script that will repeat the command multiple times.
#!/bin/bash
read -p "enter file name: " fl;
convert $fl -despeckle -despeckle -despeckle -despeckle -despeckle $fl
This script will take the provided file name and perform the despeckle operation on it five times. The output will replace the original input file. As before, make sure the you are in the correct working directory as the file you specify must be in your working directory.
The following figure illustrates what Example One will look like after cropping, deskewing, and repeated despeckling:
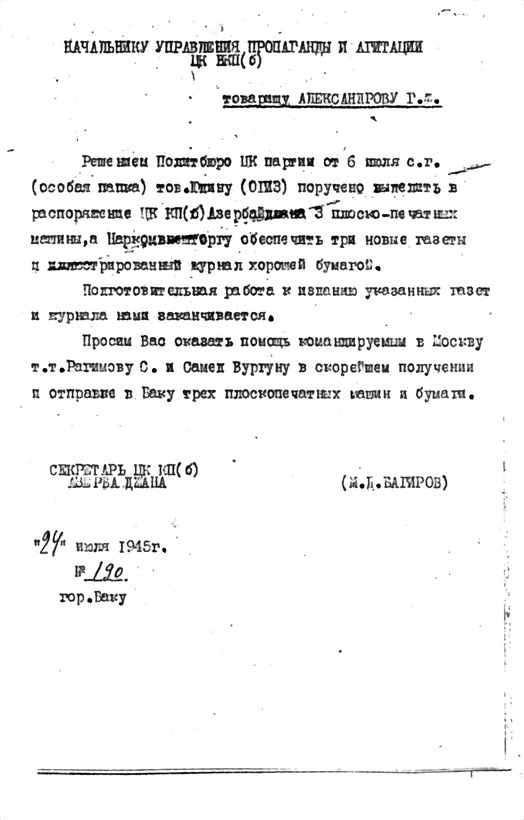
Figure 6: The new and improved version of Example One
Organize your documents
Scripting can also help you organize your documents. For example, a common problem for archival work is managing and organizing the thousands of images taken during an archival trip. Perhaps the biggest problem is cataloguing files by archival location. Digital cameras and smartphones assign photos a filename that looks something like IMG_XXXX.JPG. This filename does not tell you where that picture came from or what it contains. Instead, you might want each picture to be labeled according to the archive where it was taken. You can use a file’s metadata to write a script that renames files according to their archive.
This script will compare a file’s last modify date to the date of your visit to an archive and rename the file accordingly.
#!/bin/bash
read -p "enter archive name: " $archive_name;
read -p "enter  date of visit: " $visit;

ls -lt | awk '{if ($6$7==$visit) print $9}' >> list.txt
mkdir $archive_name

for i in $(cat list.txt);
do
  mv $i $archive_name/$archive_name${i:3};
done
This script will rename all files last modified on August 30th to[ARCHIVE_NAME_INPUT]_XXXX.jpg.
Conclusion
No single program or script will revolutionize your research. Rather, learning how to combine a variety of different tools can radically alter how you use files and what files you are able to use. This lesson used the Bash scripting language to string tools together, but you can pick from a variety of different programming languages to create your own workflows. More important than learning how to use any particular command is learning how to conduct your research to make the most of digital tools.
The Programming Historian’s Lesson Page will give you a good idea of what tools are available.
Knowing the capabilities and limitations of digital tools will help you conduct your research to get the maximum use out of them.
Even if you are uninterested in OCR and machine translation, scripting offers you something. The ability to move and rename files can help you manage your research. Command line tools will be critical to any digital humanities project. This article has given you the introduction to scripting and workflow you need to really begin using digital humanities tools.